Movavi Screen Capture Studio is a screen recorder that can be used to capture all formats of videos on the web. Nowadays, many people like to watch movies online on their computer screen. There are lesser and lesser people that watch movies on their television set.
If you frequently watch movies on your computer monitor, you might want to get a screen recorder and record it so that you can watch it any time at home. It professionally captures the video in the same quality as the video being played at the web video player.
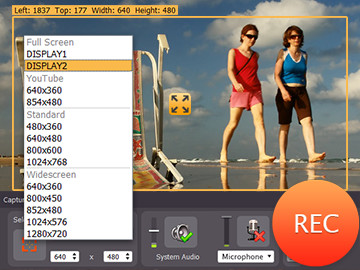
Movavi Screen Capture Studio supports recording of a selected part of the computer screen or recording in full screen. If the video player is not in full screen mode, you must first adjust the recording frame so that it will only record the video and not other areas on the computer screen.
You must click on the red focus button under Select Capture Area and then click on the video player to set the recording frame over it. You should choose full screen if you want the screen capture software to capture the entire screen.

If you also want to capture sound in the movie, make sure you don’t forget to check System Audio and drag the volume slider up to record the movie sound clearly. The 5 seconds countdown timer will pop up when you click the REC button. You can wait until it reach 1 or 0 before clicking on the play button in the video player. Get more details at www.movavi.com/support/how-to/how-to-capture-video-from-site.html .
If the video is too long, you should divide the screencast recording into several sessions. For example, if the video lasts for 3 hours, you can record the video in 3 sessions with each last for 1 hour. In this way, you don’t have to stay in front of your computer for 3 hours to monitor it. If you prefer not to monitor the video recording, you can set the timer to stop exactly at the time when the video stops playing.
Screencast video can easily take up a lot of disk space so you want to make sure your hard disk has a lot of free space before you start recording. On the control panel, you will see recorded and left on disk. Recorded shows the size of the video that is being recorded up to that point in real time.
Left on Desk shows how much disk space is left on your hard disk after having taking into account the recorded video file size. The recorded video file size is also shown on the yellow tab of the recording frame. The recording frame is red in recording mode and yellow when it is not in recording mode.
For a good quality video, the recommended screen capture frame rate is 30. You can easily set the screen capture frame rate by selecting the Capture menu and choosing Preferences. When the Preferences dialog box appear, you must select the video tab and choose your desired frame rate in the Maximum capture frame rate drop down menu.