In this tutorial we will talk about how you can create an ad-hoc wireless network, so that you can quickly use your phone or other devices to wirelessly connect to the Internet, to the same network as your PC in the absence of a router. This type of wireless networks also allows users to quickly share files and folders between various devices. The guide will be divided into three parts: the creation of ad-hoc wireless network, connecting other computers to it and sharing files and folders within the network.
NOTE: Before following these steps, make sure that the wireless adapter is turned on all devices that you will use for this purpose.
Step 1: Create the Ad-Hoc Wireless Network
First, open the Network and Sharing Center in Windows Vista, Windows 7 or Windows 8. Click “Set up a connection or network”. You will be taken to the wizard shown below.
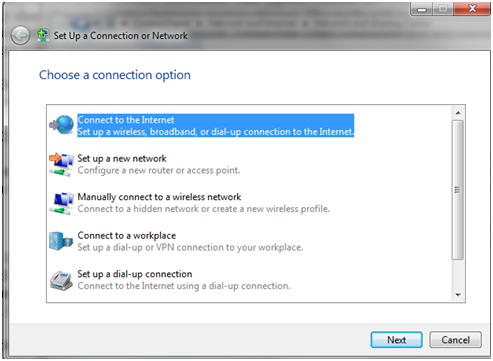
With the help of the wizard, you can configure all types of connections to your workplace. From the list of options, select “Configure wireless ad hoc (computer-to-computer)” and then click Next. A new window will appear that describes the things you can do in an ad-hoc wireless network. Read the contents of the window, and then click Next.

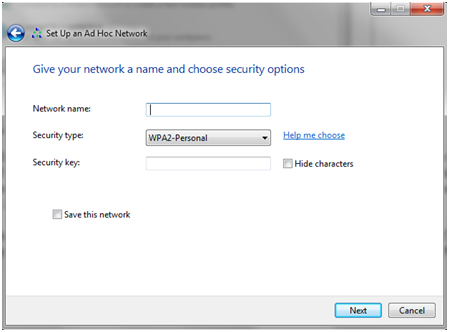
Now is time to configure the network. First, enter the network name and select the type of security you want to use. For a higher level of security, we recommend that you select WPA2-Personal. This type of encryption provides better security and is much harder to crack than WEP. Then, type the password you want and where you want to use this network and check “Save this network” if you want to use with other occasions. When finished, click Next.
The wizard will create the network. This activity should not last more than a few seconds. When finished, you will be notified that the network has been created and is ready for use. Make sure you remember your password and click Close.
Step 2: Connecting to other computers to the network
It’s time to connect other computers to the network. On the client computer, click the network icon in the notification area and you will see a list of available networks. Select the ad hoc network we just created and click Connect.
The network password will be requested. Once you’ve written it, click OK. It takes a few seconds until Windows connects to the network. When finished, the window will disappear and you can start using the network.
Step 3: Sharing Files & Folders on the network
After setting up the ad hoc computer-to-computer network and you have finished connecting all client computers, you probably want to share files and use other features. The thing you should know is that after the network is detected, Windows 7 will allocate a public network location. This means that you cannot share anything.
Another problem is that you cannot change the network location from public to office or home. However, sharing content is possible by copying the content you want shared on the network into the Public folder. This folder is usually found under C:\Users\Public.
Last but not least, when you disconnect from the ad hoc network, be sure to reset all settings of the network profile. If you leave these settings unchanged the next time you connect to a public network, your computer will give anyone access to your files and folders.