Windows DVD Maker has been introduced with Windows Vista and is also present in Windows 7. Unlike other integrated applications Microsoft distributes with its operating system, Windows DVD Maker does not show major differences in Windows 7 from the version present in Windows Vista. At most, the differences are cosmetic in nature, but the application works the same way. In this article we will cover the files supported by Windows DVD Maker, as well as what you need to do in order to burn a disc with this software.
One thing to note before starting is that Windows DVD Maker is included only in Windows 7 Home Premium and Windows 7 Ultimate. To find Windows DVD Maker quickly you can use the search feature integrated with the ‘Start’ button. Alternatively, you can find it in Start -> All Programs -> Windows DVD Maker. This will take you to the following window:
What files does Windows DVD Maker support?
Before talking about the actual process of writing a DVD, we will mention the types of files that can be written with Windows DVD Maker:

- Video file formats: . ssf, . avi, .m1V, .mp2, .mp2v, .mpe, .mpeg, .mpg, .mpv2 and .wmv.
- Audio File formats: .aif, .aifc, .aiff, .asf, .mp2, .mp3, .mpa, .snd, .wav and .wma.
- Image File formats: .bmp, .dib, .emf, .gif, .jfif, .jpe, .jpeg, .jpg, .png, .tif, .tiff and .wmf.
Regarding the types of discs that these files can be written to, Windows DVD Maker supports writing to DVD + R, DVD + RW, DVD-R, DVD-RW and DVD-ROM, provided your computer has a compatible drive to achieve this. Regarding Blu-Ray, Windows 7 does not offer native support for these disks, which means that you cannot write such disks with Windows DVD Maker.
How to add media to write on a disc
When you start Windows DVD Maker a window with information about what you can do with this app will be shown. You can disable it selecting the “Do not show this page again”. To begin the process, click on “Choose photos and videos”.
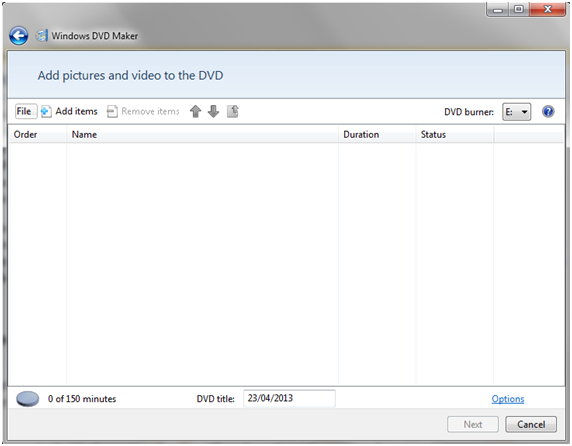
In the main window of Windows DVD Maker you will be provided with a way to add and organize files and even save your DVD compilations for future use.
To add images or videos, just click on the “Add Item” from the top menu. Browse to find the image or video you want to add, select it and click the Add button. You can select multiple files by pressing and holding down the CTRL key while you select. Alternatively, you can simply drag the Windows DVD Maker window any image or video you want to write to your DVD directly from Windows Explorer.
Finally, it is recommended that you also choose the option “Start with DVD menu”. In this way, when you insert the disk into a DVD player, for example, you will have an easy way to access the files you are interested in, without having to see all the videos, for example. Also, if you have a widescreen TV, select the 16:9 picture format, and if not, keep the 4:3 aspect ratio. Video format depends on the country you live in, for example North American countries use the format NTSC, while if you live in Europe you should select PAL.
Last but not least, the menu of the DVD can be customized, but this is beyond the scope of this tutorial.