In this guide you will firstly find out what Task Scheduler is, then you will be presented with some information about how to navigate through its interface and benefit from everything it has to offer.
Features of Task Scheduler
Windows Task Scheduler allows us to plan activities that execute automated actions at specified time or when a specific event occurs. The application enables users to navigate between activities defined by them or by the operating system using a library of all program activities. A large number of details are available for each activity, giving users all the information needed to manage it. The task Scheduler Library enables disabling, modifying or deleting tasks.
In order to understand how Task Scheduler works you must know two terms: triggers and actions. A trigger is the cause / event that will cause the action to be executed. Possible triggers include putting the computer in sleep mode, logging in to Windows, etc. An action is the process that is executed when the activity is triggered. Different actions can be performed, such as running a program, sending an e-mail or displaying a message. For example, you can schedule cleaning the hard disk every week. Both triggers and actions can be defined by you and there are innumerable possible combinations.
Where to find Task Scheduler
Now that you know what Task Scheduler is, here is where to find it: go to “Start Menu -> All Programs -> Accessories -> System Tools -> Task Scheduler”. You will be presented with a window similar to the one below:

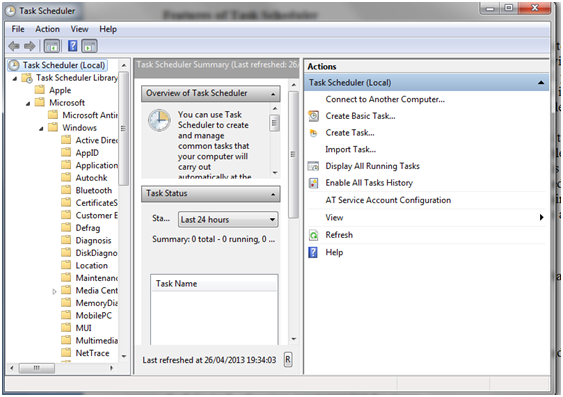
Once you open Task Scheduler will see three panes:
- Task Scheduler Library (Library) – from here you can navigate between activities;
- Task Scheduler Summary (Summary) – displays information about the latest activities;
-
Actions – Allows you to create, import, or delete an activity, or run, disable, enable and set the properties for a particular activity.
Working with the Task Scheduler Library
On the left side of the Task Scheduler window you can see the “Task Scheduler Library”. Click the arrow to display its contents. This will reveal a list of activities. For each of them you can see the Name (Name), Status (Status), Triggers (Triggers), ‘Next Run Time’ and ‘Last Run Time’, but also ‘Last Run Result’.
Click on one of the activities to see more information about it. Click the Triggers tab to see a list of conditions that trigger the activity, which will reveal details about the trigger and show whether it is active or inactive. The third tab, called Actions, displays the action that will occur when the activity starts, along with some details about it. For example, if the action is “Start a Program” (Run a program) in the Details column you will see that the program will be started.
Finally, the Conditions tab will show all the conditions that must be true, along with the trigger (trigger), so that the activity is run. The conditions are related to the status of the computer (whether or not in sleep mode, for example), the type of power supply (AC or battery) and the network it is connected to.