Often, a new font can make a document or a presentation you’re working on more successful. Although Windows 7 brings a wide range of fonts, you can opt for additional fonts offered by various websites, sometimes even for free. Once you download a font you will need to install it and, when you no longer need it, you can remove it or simply hide it. In this article you will learn exactly how to do this, so if you have never worked with fonts in Windows reading on can help you.
How to install fonts
The first thing to know when installing a font is that you need to have Administrator rights to the machine you will be working at. A regular or a guest account is not enough because of the lack of privileges, so make sure you are using an Administrator account. Also, after you download the font you want you will need to make sure you unzip it if it is in an archive format.
There are two ways to install a font. The first option is to double click on the font, and then click install. Fonts usually come in formats such as .otf or .ttf. When double clicking on such a file, you will be shown a window similar to the one below:
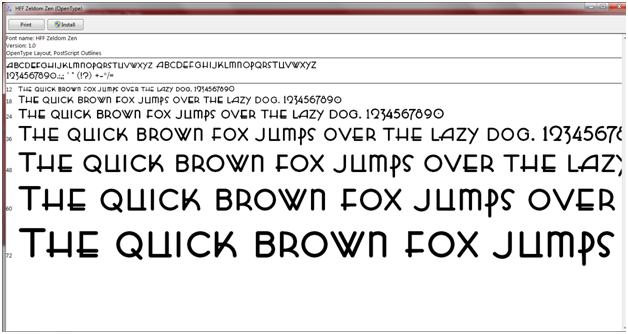
Just click install if you see this window. Alternatively, you can just right click on the font file and select Install from the dropdown menu. Now you can use the font you just installed in any text editor by selecting it from the list of available fonts. The advantage of Windows is that all fonts are stored in a single place and any changes made to the fonts folder will be visible in programs such as Microsoft Word.
How to remove or hide fonts

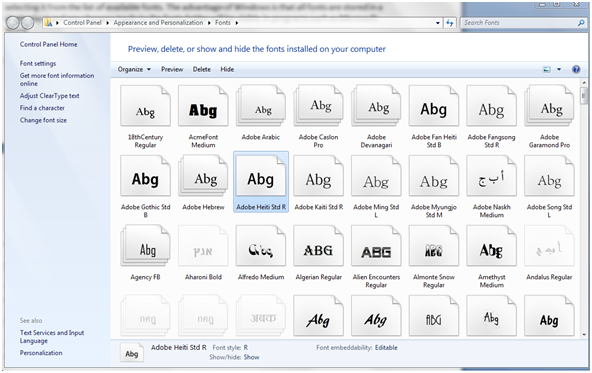
To uninstall a font, you must go to Control Panel and select “Appearance and Personalization”. From the “Appearance and Personalization” menu choose Font. This is the panel where you can organize, preview, remove or hide your fonts. To remove a font, just select it and then press Delete. The fonts folder will look like in the following image:
You can also to hide a font instead of removing it. In order to do this, just press the font and click the Hide button on the panel above. The font will then be grayed out. If you want a font that you previously hidden become visible again, select the font and click the Display button.
By default, Windows 7 will hide fonts that were not designed for your language settings. For example, if you language set is English fonts linked to Chinese or Japanese, for example, will be hidden. If you want to change this option so that these fonts are not hidden by default, then select Font Settings from the left side of the Fonts folder and uncheck the box “Hide fonts based on language settings”.
All in all, working with fonts is a fairly straightforward process, but it is useful to be aware of the steps presented in this guide if you want to make your documents more spectacular.