VCR, Video cassette recorder is an electromagnetic device used for various recording purposes from television broadcast or other sources. VCR gained extensive popularity in the past few decades due to its numerous advantages. VCRs were the main cause of the rise of the home video industry that gave business to millions of people. VCR was first released by Philips in 1970, is a recording and playback device used with TVs which allows you to record a show on a magnetic tape. Home VCRs usually have a television broadcast receiver or tuner for TV signal reception and a clock that can be programmed to record for the start and end time specified by the user.
The rise in its popularity led to stiff competition in the production market. Key VCR manufacturers are
– Panasonic
– Matsushita Electric
– Sony
– JVC
Products manufactured by them were more efficient with advanced technology that made them stand apart and hence lead the market.
The Advantages of VCR are:
– Record TV programs to view at convenient time
– Reliable Storage option for important records
– Start a home video business
Digital cable box when connected to VCR provides enhanced benefits. The connections must be secure and according to the respective power rating of the devices used. VCR must be bought from a reliable dealer in order to have appropriate performance. The device to be purchased must fulfill your requirements and must not need frequent maintenance. It is important to look for customer feedback for the product before buying the same.
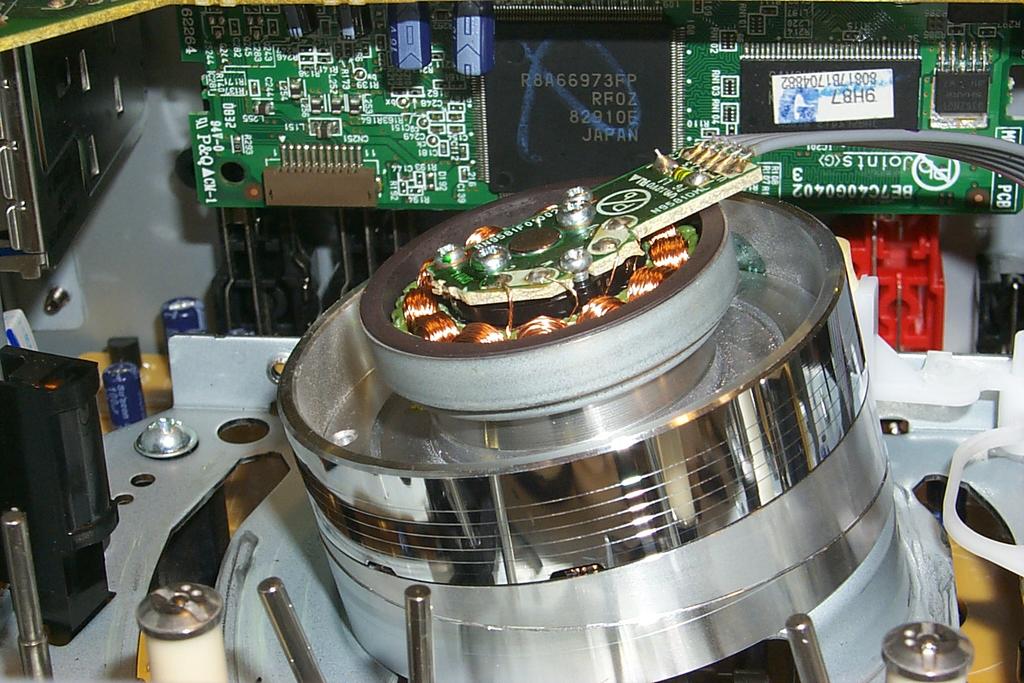
Cleaning VCR Heads
In order to have enhanced picture quality from your VHS tapes you need to clean your VCR heads from time to time. Several types of cleaning tapes are available in the market. The cleaning procedure is quite easy but requires care so that data stored or the delicate structures of the VCR are not damaged. Particles may come off the magnetic tape of the VCR and accumulate on the record heads which may diminish the quality of the signal received. Smudges and dirt must be removed from the record head so as avoid maloperation.


Stepwise Cleaning Guide
Step 1
Ensure that there is no tape in the VCR and turn the VCR off.
Step 2
Unplug all cables connected to VCR and place it on a flat surface.
Step 3
Use a screwdriver to remove the VCR cover.
Step 4
A shiny round drum like structure visible is the Head drum. Take a chamois tipped stick dipped in an appropriate cleaning agent
– Freon
– Alcohol ex. Isopropyl
– Acetone
– Amyl nitrite
Place the stick on the drum applying light pressure.
Step 5
Rotate the head drum freely but keep the cleaning stick stationary against the drum. It allows the cleaning fluid to clean the Head drum.
Step 6
Use a fresh chamois stick and cleaning fluid to clean the stationary audio head, capstans, gears and rollers. Use cleaning fluid in appropriate measures and ensure no dirt is left.
Step 7
Use a mini vacuum cleaner to clean the circuit board of the VCR.
Step 8
In this open VCR insert a tape, do necessary connections, connect to TV and turn it on. Make sure the VCR is working properly by pressing the play button.
Step 9
If the performance is satisfactory screw the VCR lid back, if not you need to repeat the above mentioned steps.
Points to Remember
– Cleaning of the VCR head is not advisable when the device is in warranty period
– Ensure the availability of the things necessary for cleaning the head.
– Do not move the cleaning stick vertically as it may snap head projections on the drum.
This whole process is followed by VCR Players.com, a premier provider of VCR Players, providing refurnished VCR Players.