In this article you will be introduced to one of the most powerful tools available in Windows, the Command Line. This is a complex instrument that can be used for various purposes. In this guide we will start by explaining what this tool really is and how it can be used for customizing your operating system.
What is the command line?
Before the existence of Windows, the most popular operating system was DOS (Disk Operating System). It was a text-based operating system that allowed users to run programs by manually entering commands. The launch of the Windows operating system has simplified the way people could use computers, as this process became more visual. Even though DOS has not been included in the latest version s of Windows, the command line tool is still distributed with this operating system, which is able to interpret commands that used to be accessible for DOS.
This tool is generally used by more experienced users such as system administrators to run commands that cannot be accessed from the Windows visual interface. Even though it may seem a little unfriendly, it does not mean you cannot learn how to use it. If you follow the steps below you will see that in fact the command line tool is fairly straightforward to use.
How to open the command line
There are several ways to access the command. You can go to the Start menu, select All Programs -> Accessories, then Command Prompt. Another way is to type the word “prompt” or “command” in the search box integrated into the Start menu and choose Command Prompt from the results.
The application that will open should look like the one below:


Note that when you first open the app, you will see that the command line opens with the the default path: “C: \ Users \ (username)”
When you need to run the application with administrator rights, just right-click its shortcut and choose “Run as administrator”. The default path will now be C:\Windows\System32.
To access the command line properties and customize them, right-click on it and select Properties. You will see four tabs with configurable options: Options, Font, Layout and Colors, just as below:
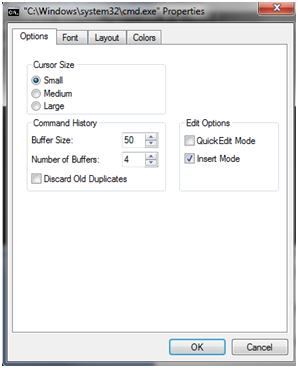
First, the Options tab has in turn three sections: Cursor size, History and options for editing.
The cursor size can be chosen from one of the following: Small, Medium or Large.
In the Order History section you can decide how many commands are stored in the buffer (buffer). This order history records commands that were previously run so that you can easily access them just by pressing the up and down arrow keys on your keyboard. You can choose to store up to 999 commands in the buffer.
The next option, “Number of buffers” determines the maximum number of buffers functional at the same time. For example, if you change the default to three, you can have up to three instances of the Command Prompt tool open at the same time, each with its own buffer. The last option in this section, “Discard old Duplicates” allows Windows to remove duplicate commands from the buffer.
Under Editing options you have only two options: Quick Edit Mode and Insert Mode. The first allows users to use the mouse to cut and paste text to and from the command window. The second, Insert mode, meets virtually the same function as the Insert key: the text is inserted at the cursor position exactly.