There are many Windows users who need to use multiple languages for their keyboard to edit their documents. Adding multiple languages and switching between then is fairly easy in Windows 7 and Windows 8. Both operating systems provide this option without too much effort from the user. In the following lines you will find out how this can be done with just a few clicks.
The Language Panel
Before adding a new language for your keyboard, you must first know where to make the required changes. Most of these can be configured in the language panel, which can be found in Control Panel. Open Control Panel and then select ‘Clock, language and region’. This will give you access to two options: Date and Time and Region and Language. For the purpose of this guide we will use the second one. Click on Region and Language and a window similar to the one below will be displayed:
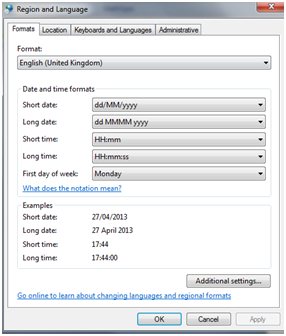
In the first tab, Formats, you will be able to change the default language used for your keyboard. In the picture above, this is set to UK English, but there are plenty of options to choose from. Next, the Date and time formats section enables you to change the way date and time are displayed in your operating system. Select the options you are more familiar with. A live preview of the option selected will be displayed in the panel below, under ‘Examples’.
The second tab, Location, will reveal the following options:
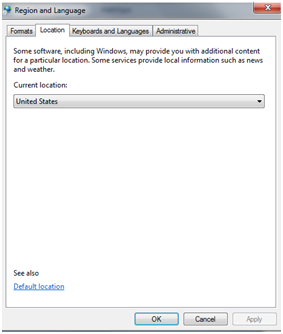

Just select the country from where you are using the machine, and all the applications that can provide specific features for your location will be informed by the operating system.
Now, in order to change the actual languages associated with your keyboard, you need to access the third tab, Keyboards and Languages. This will reveal the following menu, after you click the ‘Change keyboards..’ button.
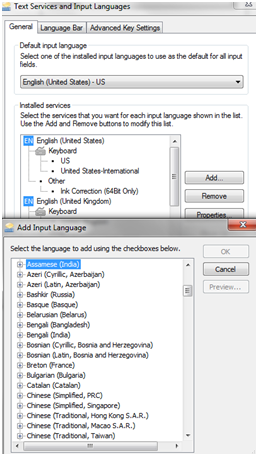
This is a panel where you are shown all the languages that are currently installed for your keyboard. If you want to add an additional language all you need to do is click the ‘Add..’ button, which will reveal the second panel (the one below in the image above).
Select all the languages you want to add and click OK. Similarly, if you want to remove a language you just need to use the same panel and click ‘Remove’ instead of ‘Add..’.
Finally, you may find it useful to know that there is a shortcut which you can use to switch between the languages you have chosen to install for your machine. This can be done by pressing Shift + ALT at the same time.
Conclusions
If you are a multilingual Windows user and your work requires the use of several languages, it is useful to know how to add or remove languages to your keyboard. Fortunately, Windows 7 and Windows 8 make this procedure very straightforward, as you have seen in this guide.