Want to hide or unmount a Windows partition so that it can no longer be seen or written to? If yes, then you should most definitely continue to read this article because you will learn how to do so. There are two main ways of doing this, using Computer Management or the Command Prompt. In addition, you will also learn how to restore such operations performed on a partition.
Why would you want to hide a partition?
The reasons why you may want to do this vary depending on the context:
- If you have installed multiple operating systems on your computer you may want some partitions to be accessible only to certain operating systems.
- If you work as a system administrator, you may want to hide a partition that contains recovery utilities on each of the computers on the network.
Whenever you unmount a partition in Windows (any version of it), the setting are retained until you manually re-mount the partition. The partition will be invisible to all user accounts defined in the operating system, but will continue to exist and its contents will remain intact. If there are other operating systems installed on the same computer the partition will normally not be hidden for them. Furthermore, defined user accounts of the initial operating system will be able to access and use the partition.
Hiding (removal) of partitions in Disk Management
The first step is to open Disk Management or Computer Management and then Disk Management section. You will see a window similar to the one below:
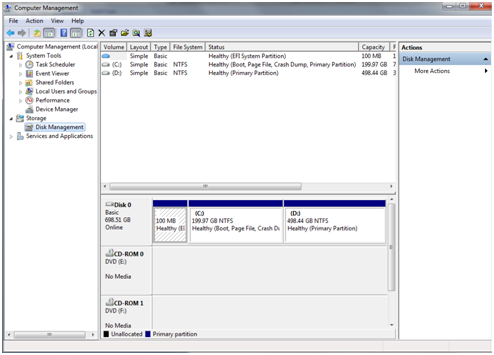
Here you will see a list containing all existing partitions on your computer. Right-click the partition you want to hide (or unmount) and select “Change drive letter and paths.” In the “Change drive letter and paths” menu click the Remove button. You will be required to validate the action. Click on Yes.

Note that if you are running applications that use files on the partition, you will be warned that the partition is in use. Close all applications that may use files on it and then click Yes to continue the elimination of the partition. Now the partition is hidden (removed) and will no longer be accessible to the operating system you are using at the moment. Windows will remember the setting that you applied to the partition and it will not be accessible unless you restore the operation.
Hiding (removal) of partitions from the command line
The same result can be achieved in the Command Prompt tool. Launch the Command Prompt with administrator privileges. Then, type the following command: mountvol drive letter / D. Replace “drive letter” with the actual partition that you want to hide. For example, if you want to hide partition D type
mountvol D: \ / D. The / D comes from dismount.
If you want to learn more about the command parameters mountvol, type mountvol /? And you will have access to detailed information, just as shown below:
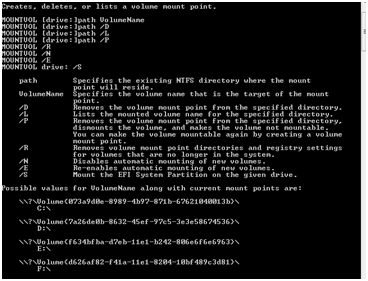
Note that if you do not run the command line with administrator privileges the above command will not work properly.
Restoring hidden partitions
If you want to mount a partition so that it will be available again, open Disk Management and right click on the partition. Then select “Change drive letter and paths”, as above. In the “Change drive letter and paths”, you will see that the partition has no letter assigned to it. To make it visible again it needs one, so click the Add button. From the drop-down menu select “Assign drive letter”, then choose the letter you want to assign to the partition. It can be an old or new letter. Once you have chosen this, click on OK and the partition will be visible again.