Windows 7 comes with an included utility for managing your hard drive, which allows you to create, resize and delete partitions without having to resort to any kind of external disk utility. This may be useful because sometimes you would have to pay a lot of money for disk management tools, so before you do that it would be wise to give the Disk Management tool a go.
How to access the Disk Management utility
To open Disk Management in Windows 7, go to Start menu, right-click on Computer, and select Manage. The Computer Management tool will open. One the left side of the window, select Disk management under the Storage section, and you will see the following:
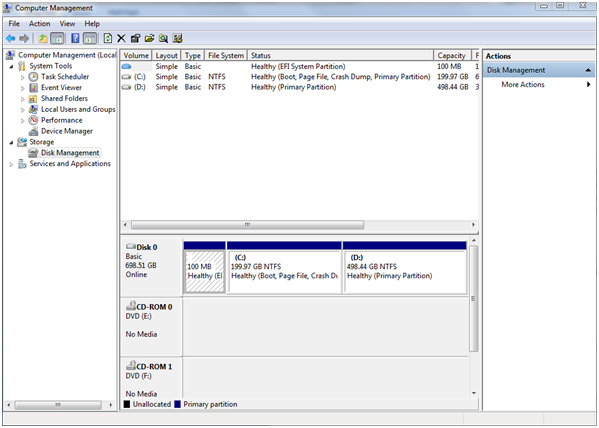
The size, name and type of each partition of your hard drive will then be displayed. Note that Disk Management can only manage file systems compatible with Windows operating systems, such as FAT16/FAT32 and NTFS. Although you can see other partition types, such as those created and formatted by Linux or other operating systems, all you can do is delete them.
There are cases where you may want to delete a partition on your hard drive or make space for the expansion of an existing partition or to recreate the partition but with a different size or file system. In order to remove a partition, all you need to do is right click on it and select “Delete Volume”. You will be required to validate the action and warned that you will lose the data on that partition. It is therefore important to make sure you have a backup of the important files before formatting the partition.
Creating a new partition

If you have some free space on your hard drive, then you can create partitions using the disk management application. Unpartitioned space will be stored separately and will be displayed as “free space”. To create a partition from the unpartitioned space, right-click on it and select “New Simple Volume …”. This will open the New Simple Volume Wizard. Click on Next.
The wizard will ask you for the new partition size. When the wizard prompts you to assign a drive letter for that partition, click Next, or choose a different letter than the one provided by default, and then click Next. You will then be asked about how the partition will be formatted. In most cases it is better to use NTFS. NTFS is the default file system since Windows NT, offering a better performance and security improvements over FAT16/FAT32. When formatting is complete, you will see the new partition listed in the same tool.
Resizing a partition – expand & shrink
You can reduce or enlarge NTFS partitions, as well as FAT16/FAT32 partitions, provided there is free space immediately before or after the partition you are trying to change. The process of expansion does not require formatting the partition. In order to achieve this, right-click the partition and select “Extend Volume …”, which will open the Extend Volume Wizard.
Click Next, and the wizard will display the space available to add to the current partition. Click Next, and you will see a brief summary of the changes. Click Finish to apply them.
Finally, there are many cases when you may also want to decrease (narrow down) a partition. Partitions that are managed by a Windows operating systems may be shrunk with the purpose of using the free space obtained for creating a new partition. All you need to do is right click on the partition you would like to shrink and select “Shrink Volume”. After a few minutes, you will be presented with a window similar to the following one:
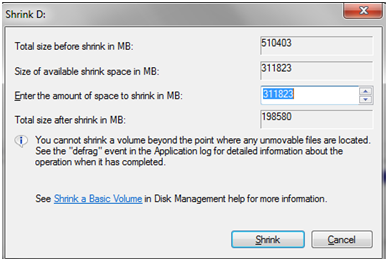
Select how much space you would like to remove from the partition and click Shrink.